
Raise Insects for Frog Food
Fruit flies
 Fruit flies are a very healthy food source for your frogs and should be
considered a must in their menu-planning, if you have smaller species of frogs.
Fruit flies are the size of knats, so not a good food source for our larger
varieties of frogs.
Fruit flies are a very healthy food source for your frogs and should be
considered a must in their menu-planning, if you have smaller species of frogs.
Fruit flies are the size of knats, so not a good food source for our larger
varieties of frogs.
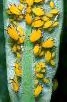
Caring for them is easy with just a few basic supplies. You will need a fresh culture to start.
First obtain a living culture. They will be housed with a pectin gel, which is a type of fruit sugar. It is available from a supermarket, found in the canning supplies aisle. Like the container in the picture, keep the pectin from molding, (In the photo it is the dyed green goop on side of container) and change when neccessary. Cooling them in your refridgerator about 20 minutes will cause them to tame down enough for you to lift the lid and clean up.
The culture can be kept continual if you keep good housekeeping traits. Place several pieces of cheesecloth inside their container for them to rest on. This will also allow you to pull one out every now and then to place inside the frogs' enclosure for feeding. Shake them off inside the vivarium and then return the cheesecloth to the insect culture.

Culture some pillbugs
 Pillbugs are cool little animals that have legs that are all of about
the same size. Called 'terrestrial isopods' their common names include sow bugs, wood lice,
pill bugs and rolly-pollies. They are not really bugs. Instead, they are among
the few crustaceans that live on land. Even though they are terrestrial, they
still need high humidity to survive. They live under and in rotten wood, under
stones and decaying leaves, and in other dark, moist places.
They are active at night at which time they search for their food; decaying vegetation. Look for them in darkened woodlands, in the places named above.
Pillbugs are cool little animals that have legs that are all of about
the same size. Called 'terrestrial isopods' their common names include sow bugs, wood lice,
pill bugs and rolly-pollies. They are not really bugs. Instead, they are among
the few crustaceans that live on land. Even though they are terrestrial, they
still need high humidity to survive. They live under and in rotten wood, under
stones and decaying leaves, and in other dark, moist places.
They are active at night at which time they search for their food; decaying vegetation. Look for them in darkened woodlands, in the places named above.
 To begin a culture of pillbugs, place some clean sand in the bottom of a small
1 or 2 gallon acrylic tank or large sterilized pickle jar
and spray it with room temperature spring water. Scatter a bit of decaying leaf material
and/or some torn and brusied lettuce greens
on the bedding and add the sow bugs. Poke some tiny holes in the lid for air, and place on the culture container.
Maintain the culture at room temperature (20 to 25 C, or 68 ° to 77 ° F)
in a dark place. Keep the sand moist but not wet. To enhance their meals, add a bit of
To begin a culture of pillbugs, place some clean sand in the bottom of a small
1 or 2 gallon acrylic tank or large sterilized pickle jar
and spray it with room temperature spring water. Scatter a bit of decaying leaf material
and/or some torn and brusied lettuce greens
on the bedding and add the sow bugs. Poke some tiny holes in the lid for air, and place on the culture container.
Maintain the culture at room temperature (20 to 25 C, or 68 ° to 77 ° F)
in a dark place. Keep the sand moist but not wet. To enhance their meals, add a bit of
 vitamin-powdered potato ,an over ripe banana wedge or apple once
or twice a month. In mortar and pestle or a food grinder, powder up a calcium tablet and dust the fruit before feeding to the pillbugs. The sow bugs should do well with little care. Females produce
eggs and carry them in a small ventrally located pouch. The young look like the adults but are smaller.
vitamin-powdered potato ,an over ripe banana wedge or apple once
or twice a month. In mortar and pestle or a food grinder, powder up a calcium tablet and dust the fruit before feeding to the pillbugs. The sow bugs should do well with little care. Females produce
eggs and carry them in a small ventrally located pouch. The young look like the adults but are smaller.
Mature pillbugs are a great change in your frogs mundane diet, and will be eagerly sought after! You can dust them with a powdered herp vitamin mix before serving.
Raising aphids
Note: If the vivarium your frogs live in contain live plants, you will not want to allow any aphid to escape uneaten! Aphids are parthogenic, not to mention highly destructive to tender plant stems!
 Aphids are small, delicate insects that are 'herded' and maintained by ants. The
ants care for them in order to 'milk' the sweet juices from their abdomen. This juice is
extracted from the plant leaves and tissue that the aphids suck on in order to survive.
So in order to raise aphids you will also need to raise some plants that aphids like
to eat.
Aphids are small, delicate insects that are 'herded' and maintained by ants. The
ants care for them in order to 'milk' the sweet juices from their abdomen. This juice is
extracted from the plant leaves and tissue that the aphids suck on in order to survive.
So in order to raise aphids you will also need to raise some plants that aphids like
to eat.
There are several coloration varieties among the different species of aphids. The more colorful types can help in maintaining your frog's natural pigmentation. Yellow, red, white and brown are a few of the aphid's colors.
 Aphids are excellent food sources for tiny species of frogs such as mantellas and dendrobatids, froglets and morphlings.
Of course, other frogs will eat them as well, so if you
have a little extra space and want to give it a try, read on Frog keepers!
Aphids are excellent food sources for tiny species of frogs such as mantellas and dendrobatids, froglets and morphlings.
Of course, other frogs will eat them as well, so if you
have a little extra space and want to give it a try, read on Frog keepers!
In order to grow the host plants, you will need four small jars, (not tall jars, short is
what we want) clean
sawdust,
some potting soil, a package of beans meant for garden growing
purposes, and one cage that you will make for the aphids.
It can consist of a thin wood frame with window screen siliconed and stapled around. The cage should be about 18" tall and at least 10" wide. You can make a lid of screen as well, or use a sheet of glass that you have sanded the edges of to ensure you will not get cut when you go to pick it up.
Now you will need the aphids. You can find your own (make sure from plants not treated with pesticides) on garden plants in late spring and summer. They will be near the newest, most tender shoots. Allow the bean plants time to sprout and supply food before you collect the aphids.
 Place some of the sawdust and potting soil mixture, until about 2/3 full, into
each jar. Push one or two bean seeds into the center of each jar, and water
lightly with clean spring water. (Do not over water, you'll spoil the beans)
Place the jars into the insect cages and make sure the cage can receive
strong
light in a window sill.
Place some of the sawdust and potting soil mixture, until about 2/3 full, into
each jar. Push one or two bean seeds into the center of each jar, and water
lightly with clean spring water. (Do not over water, you'll spoil the beans)
Place the jars into the insect cages and make sure the cage can receive
strong
light in a window sill.
Make sure the seeds are not allowed to dry out, but again, don't over water them either. After 5 to 8 days, the beans will come up and the aphids will have the tender new leaves of the bean plants to eat. Mist the plants at the base, spraying only the soil, as otherwise you may knock the delicate aphids off into the soil and kill them.
After 4 or 5 days you will have fed the aphids to the point to where the frogs can now eat them. Collect them by placing a black piece of construction paper under the plant, and tapping it slightly towards the paper. The white aphids will fall onto the paper, which you can now take directly to the frogs feeding dish. To keep the aphid culture alive, you must keep growing baby bean plants, so you may want to start some more out before you feed the first batch to the hungry gang. And remember, if you have live plants in your frog's vivarium, the aphids may go after them until the frogs are able to find and eat them. Feed only what you can watch the frogs consume then, and remove any that they leave.
Raising crickets
 Crickets are really easy to care for and raise.
 A cricket colony and hatchlings can be easily raised in a couple of tall plastic sweaterboxes, placed on a human style heating pad. The pinheads (or newly hatched babies) can be given a smaller version of this. If you'll be dipping into the crickets to feed your frogs as well as use for breeding, be sure to buy at least 200 to 250 of them to start off with. This will give your newly hatched babies time to develop into adults before you've exhausted your original supply.
First, cover the bottom of the container with about an 1" of damp sand. Spray the sand through use of a misting bottle, with treated water until moist. The sand will provide enough water for small crickets, but adults and larger juvenile crickets should have a small lid or similar container filled with water as well. Adding a non toxic sponge to the water container will prevent drowning of the youngsters. Clean the sponge by squeezing out a minute or two in treated water once a week before replacing in lid. Flukers also makes a calcium-fortified cricket gel to replace water. Add paper towels or cardboard egg cartons, paper towel tubes and toilet paper tubes to house the adults. Add the crickets.
 After the males feel comfortable, they will sit atop the egg cartons and "sing"
to the females. They accomplish their famous chirp by rubbing their wings together.
They will now soon mate, and the females will lay their eggs through use of their
long ovipositor into the damp sand.
After the males feel comfortable, they will sit atop the egg cartons and "sing"
to the females. They accomplish their famous chirp by rubbing their wings together.
They will now soon mate, and the females will lay their eggs through use of their
long ovipositor into the damp sand.
After about one week of the adults laying eggs in the sand, you can carefully scoop out as much as you can and place in the smaller plastic container. Spread it out evenly, and keep the soil moist as before. Also remove the original colony off of the heating pad, or force them to share with the egg holding container. Crickets will grow quicker if heated. If you aren't going to be using the adults up soon, cool them off. You can also add more clean sand to the original colony now if you want more eggs in a week. Place a thermometer into the egg cage, keeping the temperature between 78° and 80°. Protect them from drafty areas, and mist the egg containing sand two or three times a day. In another few days, the first babies should be hatching. Feed them as the adults, but only keep the sand moist for water supply right now. They can easily drown themselves in a larger water source while they are this small.
Crickets can be fed several different diets. I place rolled oats, skim milk powder, dried and stale whole grain wheat bread, wheat germ, parsley flakes, good dry dogfood, one folic acid tablet, one calcium tablet and dried egg powder in a blender. Then puree into powder the entire mix and place in baggies. Use as needed. They should also be given lettuce varieties, spinach and several different fruit choices as a natural supplement. The commercial pet food company, Flukers, also makes a prepared cricket food that you can purchase.
Clean the adults cage at least once a week, removing any totally soiled paper tubes, dead crickets, and keep water clean too.
Don't forget to dust the crickets with a good herp vitamin supplement once every week or so before feeding them to your hungry anurans.
Slugs
 Before capturing any
slugs, build their new headquarters. You will need some thin plywood,
in which you will cut to approximately 18" x 18" square, and 8" high.
Use a hammer and finishing nails to assemble the sides and bottom. Purchase rubber strip
molding found at Auto Parts stores to fit a lining just inside the rim of the box, about
1/2" down. Glue it in with silicone, and make sure it is level. This will form a seal
around the lid, keeping the slugs from escaping. Let silicone dry overnight.
Before capturing any
slugs, build their new headquarters. You will need some thin plywood,
in which you will cut to approximately 18" x 18" square, and 8" high.
Use a hammer and finishing nails to assemble the sides and bottom. Purchase rubber strip
molding found at Auto Parts stores to fit a lining just inside the rim of the box, about
1/2" down. Glue it in with silicone, and make sure it is level. This will form a seal
around the lid, keeping the slugs from escaping. Let silicone dry overnight.
Cut a lid from either acrylic or an old windowpane of glass. Have it fit just within the boxe's top, and make sure it sits upon the rubber "seal" you have made. Buy a small bag of sterilized garden soil at WalMart or another Garden Center, and a small bag of clean children's play sand. Pour enough soil into the new wooden box to fill to within 5" of the seal. Now add a thin layer of sand to fill within 3" of seal.
You will now need to add a flat of live moss. You can buy these at the Better Garden centers or try online. After adding the moss, add one or two long, flat type rocks to the soil's surface. Make sure not to cover up more than 1/4 of the moss with the rocks. Add a petri or other shallow dish and sink to level with moss surface. You can place fresh spinach leaves here to feed the slugs. Place within 5 feet of a northern exposed window (in shade, within 5 feet of light).
Add the slugs you have caught, making sure they have not been exposed to any insecticides. Mist the moss daily with distilled water. Remove any uneaten food once a day. Watch carefully for any white hairy fungus types, as you have created a humid environment for the slugs. Because they are invertebrates, there are very limited chemical or mineral options available to you to help with fungus problems. Mushrooms with caps that may sprout are fine, and should be left alone. Keep the temperature between 62 ° and 65 ° if at all possible.
Slugs can be found underneath cool rock slabs in an organic garden during daylight hours. (They are usually nocturnal) The brown ones seem to be more relished by my frogs. Get as many as you can. A few small red earthworms added to the soil is also recommended. They will help keep the soil fresh. With any luck, within 3 months you should have a small establishment of adults and babies. At this time you can begin offering some to your frogs.
If spinach becomes unavailable, you can use other types of leaf-lettuces. The darker green, even through red lettuce types, are best. They contain more vitamins, which will ultimately create a healthier frog.
Lastly, I suggest cleaning out all of the soil, sand and moss every 8 months or so. Slugs create slime-trails, and a clean box keeps them thriving. You can clean the rocks more often. Scrub them with a light table-salt/distilled water mix, and rinse all salt off well before returning. When cleaning the entire box, place the slugs in a few large jars while you scrub out and rinse well their home. Replace anything you feel you need to.
Note about slugs and their own "bugs"
Slugs collected from the wild could potentially contain nematodes. Nematodes can hurt, even kill your frogs. Therefore, I strongly suggest that you don't start yours off from a wild source. It is much safer for your colony of frogs if the slugs have been raised in captivity and come from a clean source. They are quite hard to find Online, so I started a culture up a year ago. Snails and Slugs are very closely related. To read more about how they can carry nematodes and infect your frogs, visit our Snails with Frogs write-up.
Termites
 Termites are fairly easy to find if you live near a forest. I find them after
it rains here, or when humidity is high. Look for them in damp areas and where
you see old rotting tree trunks and large heavy branches. Breaking open such
wood should expose them. Make sure you see a bit (not overgrown) of fungi like the thin pale-green
hairy types of fungus on the limbs, and collect them. Try to keep them intact with
the wood.
Termites are fairly easy to find if you live near a forest. I find them after
it rains here, or when humidity is high. Look for them in damp areas and where
you see old rotting tree trunks and large heavy branches. Breaking open such
wood should expose them. Make sure you see a bit (not overgrown) of fungi like the thin pale-green
hairy types of fungus on the limbs, and collect them. Try to keep them intact with
the wood.
Termites should be highly guarded after entering your home, for obvious reasons! Be sure none can escape. These guys can create a 'nest' underground that can encompass your entire yard, starting with your houses' foundation! But with skill and precise keeping skills, you can offer your frogs a very nutritious treat. Just be sure before returning to your home that you have thoroughly checked all of your clothing and catching supplies; being sure none have been overlooked.
The termites, or Zootermopsis require relatively high humidity at ordinary room temperature, but can survive in a wide range of temperatures, although ideally don't let them exceed 68 °. Colonies should be maintained in a large glass culturing Jar that has a rubber seal at the lid. I use a glass cutter to cut a large hole in this container, then place over laid double layers of fine mesh screen over. Silicone glue very well the mesh screen. Place the entire limb or branch you've collected into the enclosure. They will continue eating the wood.
Every few days you will need to pour about 1/4 to 1/3 of a cup of treated water in through the hole to keep the termites wood moist for them. Fungi needs to be present as the termites need them to help digest the wood cellulose, but be sure to prevent moldy outbursts. Only wood that does not appear to be heavily infected with fungus should be used for food.
Cultures should also be kept in a darkened area. If your collecting was thorough, it should contain some nymphs and adults from two castes. Soldier termites have large heads and strong mandibles and are readily distinguished from the smaller termites that have only reproductive functions. Zootermopsis termites do not have a worker caste, since the nymphs will clean up the nest.
To establish a permanent colony, separate these nymphs from the adults. Remove any of the sick looking termites immediately. Kill by placing in tub of chlorine and water solution with dish-soap added. Leave them there a few hours to make sure they are dead.
Sometimes they will want to 'swarm'. This is when they'll form wings and you'll see the male and female sexed forms come up and try to fly. Under no circumstances should you open the lid until they have realized they can't get out, tearing off their wings and will go back to bottom of the container.
You will of course have to occasionally add more wood and fungi to the culture for them to eat.
Before feeding them to your frogs you can dust as you would the crickets in a herp vitamin supplement, once every couple of weeks.
For more information on Termites and harvesting them, try this Canadian Website: Termiculture
Tubifex worms
 Raising tubifex is not as hard as you think. If you are raising aquatic frogs like pipids,
and you are using an undergravel filter system, you can raise them right there in
the frogs' own tank.
Raising tubifex is not as hard as you think. If you are raising aquatic frogs like pipids,
and you are using an undergravel filter system, you can raise them right there in
the frogs' own tank.
Simply purchase some live tubifex (make sure they are blood red in color) and after rinsing in treated water first to remove any dead that were in the 'ball' they form, then feed about two-thirds of them to the frogs. The other one-third, place just under the gravel, out of the pipids' reach. Each time you feed your frogs tubifex from a fresh purchase, slip a few under the gravel. The tubifex will thrive here, fed oxygen by the undergravel plate, and within about a six month period, you will have a fairly substantial amount; as they will begin to breed.
Make sure to harvest some every two or three weeks after the first six months,
they will need to be lightly thinned. Don't worry that the tubifex will do any
harm to the filter. Quite the contrary, they themselves live off of the same waste materials that
 nitrifying bacteria do, and will actually help to clean it.
If you don't want to raise them in your pipid tank, and still want to raise a culture, just buy a smaller version of the tank (maybe one of those acrylic two gallon deals they sell at Walmart) and set it up with the undergravel. Make sure to supply them with some water that is dirty, siphoned from within the gravel of the frogs' tank, in order to start off the tank and give the worms something to live on while they are breeding out in new tank. Whenever you siphon water from the frogs' tank, place it in this tank. I have done this for years, and it comes in handy when the local petshop runs out of tubifex. Tubifex are also costly, and this method saves you money.
Culturing springtails
 Springtails are a good food source for small pipids. Also excellent for
tiny froglets, and small adult frogs like dendrobatids, hyla cinerea, three-toed toads,
cricket frogs and mantellas, etc.
Springtails are a good food source for small pipids. Also excellent for
tiny froglets, and small adult frogs like dendrobatids, hyla cinerea, three-toed toads,
cricket frogs and mantellas, etc.
Springtails live in damp leaf litter in nature, and feed upon fungii found there. Tomocerus lamelliferous is a surface variety of springtail, and most likely the species you will receive when ordering a culture.
Start with a clean container such as a large mayonnaise jar or pickle jar. Place about 2 inches of loose peat moss or sphagnum moss inside. Add a thin layer of LECA (Lightweight Expanded Clay Aggregate hydroponic media). Make sure to moisten with spring or distilled water, being sure it is wet through and through, but not dripping. Add the springtails and sprinkle some flake fish food on the surface. Now add the lid.
Every week or so, remove the lid and add some new fish food to the surface, and lightly mist the top using a spray bottle. If you see some white fuzzy fungus stuff growing in the culture jar, just spray it flat. To later feed to your aquatic frogs, just remove a small amount of the peat moss and place it in a small bowl of distilled water. The peat and springtails will separate, and the springtails will float to the surface. Scoop them out with a fish-net and add to the frog's main tank. Replenish the springtail culture by adding more peat moss to the culture jar.
Feeding your frogs Fish
Fish can carry trematode worms that will infest your frogs when they change into a free-swimming form in their life cycle. Feeding them, even keeping them, in tanks with your frogs, can potentially end up in health concerns for your frogs. The worst thing about this parasite, is by the time you usually find out something is wrong with your pet, it's too late to help him.
Unless you have a known clean source, (over 18 months, captive-bred and worm-free) I strongly suggest you keeping them away from your frogs.

Use a Herp intended vitamin powder on potatoes,
as the potatoes themselves contain little nutrients.
Wood dust can contain Formaldrahyde!
This will kill insects and if any lived to end up being fed to your frog,
it could hurt frog too. Only purchase wood dust from a Pet or Hobby Shop. Wood dust from
the floor of your fathers' Workshop is inappropriate!
'Strong Light' is considered as placing a plant
within 5 feet of a bright, sunny window.
